
Tree houses are one of idyllic childhood symbols. A special place, away from parents and school, that is just your own. It’s not hard to see why it’s an idea that’s persisted for generations. But actually building the tree house isn’t kids’ work. To make sure everything about it is exactly right - and most importantly, that it’s safe, the kids are going to need to some serious adult supervision. This is where you come in. Helping you get it right is where we come in. Here are some of the crucial issues you need to think about when designing a tree house.

Step 1 : Choosing the Right Tree
If you’re building a tree house in your back garden the chances are you don’t have a wild array of choice over which tree you’re going to put it in. However, you want to make sure that it’s a sturdy one that isn’t going to sway too wildly in the wind or buckle under the weight of the house itself. Find a healthy tree, then start building your design around it - the tree itself is going to be part of the structure of your house, so you can’t simply take a standard tree house design and plug it onto any old tree, you have to work around it. Ideally you want a tree with a trunk that’s at least twelve inches in diameter, which should support a house of eight by eight foot. You can work out the tree’s diameter by using the old school trick of wrapping a tape measure around it and dividing it by pi - even better, get your kids to do it and they’ll learn some maths while you’re making their tree house !
Once you’ve found your tree, you need to start drawing up plans. There are plenty of tree house designs online that will give you a place to start, but even the most comprehensive plan won’t survive contact with the actual tree, you’ll need to be able to customise it to your specific circumstances. A good way to do this is to make a mock-up out of cardboard to find any potential problems early on. There’s also one more factor that you absolutely must take into account. You’re not building on a flat surface, or even a stationary surface. That tree is going to grow, so you need to make sure that there’s plenty of space for that to happen without wrecking everything. Before getting out the hammer and nails, learn about the growth rate of your tree to avoid nasty surprises.

Step 3 : Tools
The bare minimum of hand tools: hammer, saw, level, square, tape measure, adjustable wrench. Power tools: cordless drill, jigsaw. Useful but not critical power tools: miter saw (cutting lumber to length), table saw (ripping lumber), router (rounding edges). A ladder is important, but even a stepladder would be OK if you installed a ladder/rope ladder/stairs to the treehouse early in the build.


Step 4 : Main Supports

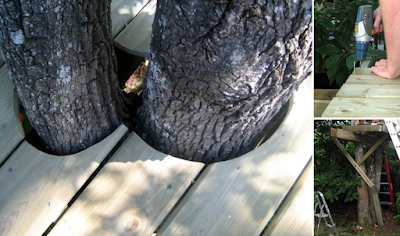
Get a strip of light wood and nail one end to one of your trees at a height about 1 ft lower than you want the floor of your treehouse (to save a future concussion, it should also be at least 1 ft higher than your head!). Get it perfectly horizontal with the help of a level and nail the other end to the other tree. Drill 5/8" holes straight into the tree just above the strip of wood. Do the same on the other side of the trees, this time taking the extra precaution of first ensuring the new strip is not only horizontal but also level with the strip on the other side of the tree. Now, take down the strips and measure the exact distance between the holes. Subtract this distance from 6' (not 8', unless you don't want the entrance platform), halve the remainder, and make a mark this distance away from one end of your 2×8. Drill a 3/4" hole in the middle of the board. Make another mark using the between-the-holes measurement .

Now drill two 3/4" holes, each 1-2" either side of your mark and both in the middle of the board. Get a jigsaw and make two cuts between the holes to make a 2-4" long slot. Repeat for the other side of the tree. The slot allows the trees to move without tearing your treehouse apart - the more your trees move, the longer the slot ought to be (note that the slots I cut are only about 2" long, but these trees don't move perceptibly at the height of the treehouse, even in a strong wind. If your trees move appreciably, and/or if you're planning to build higher up, use a sliding beam support).
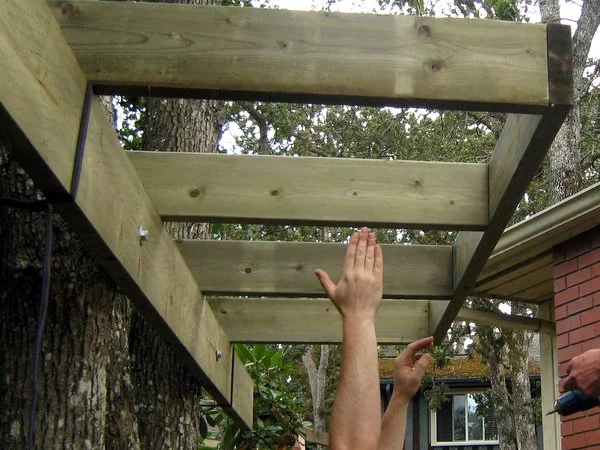
Step 5 : Build the Platform
Using 3" deck screws, attach the four 2×6's perpendicularly to one of the other 2×6's. Make sure they're spaced so that when you put it up in the tree, the perpendicular joists will miss the tree! With someone's help, put the contraption up in the tree, center it, and tie it down. Screw the other 2×6 to the other end of the platform, and check that it is centered and square. For squareness, measure the diagonals and ensure they are the same.


Step 7 : Brace the Platform
As it is, the platform will wobble dangerously. Add diagonal bracing made of 2×4, and use a single long lag screw to attach both of these to the tree. It's easiest to just cut the 45 degree angle in the 2×4 first. Use an 10" lag screw here to make up for the fact that you're going through 2 thicknesses of lumber. Note that we just used one set of braces on the single tree, because the other end had two trees and the wobble seemed insignificant. You'll need two sets for sure if you have just a pair of trees.

Step 8 : Hang a Pulley
A pulley is great fun for kids, but it's helpful for hauling tools etc. up to the deck. Put one in now, and hang a basket from it. A climbing carabiner at the end of the rope is perfect for quick disconnects. If you don't have a suitably overhanging trunk or branch, you'll just have to make one. Lag screw a 2×4 (or similar) between the two trees well above the deck (cut a long slot to accommodate movement, because you're higher up the tree), and have it protrude far enough to hang the pulley from. Bonus: you'll also have a ridgepole for your roof !


No comments:
Post a Comment